(Click on any pic for a full size version.)
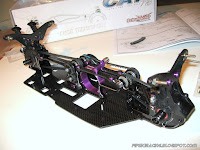
Ok then, time to get out the tools and get to work on my new Cat SX3.
I was looking forward to this build. It isn't very long since I built my SX2 and that was a really nice kit so I was keen to see how the SX3 compared.
Upon opening the box I was greeted by a familiar sight. All the parts are well packaged in clearly marked bags. The clear and well written manual gives specific instructions as to which of these bags are needed and when.
Simple as peas!
The first thing I do when I build a kit is to seal the edges of any carbon fibre parts with ca glue, this helps prevent delamination under stress conditions. There is plenty of carbon fibre in this kit so this took a while as I go a little over the top and seal every part, then polish it for aesthetics.
Tip: Use a cotton bud and thin ca glue.
Seal the shock towers and chassis as a minimum..
Seal the shock towers and chassis as a minimum..
The first part of the build involves bolting the bulkheads to the chassis and installing the drivetrain. Lots of bearings and pulleys to deal with but follow the intructions and you wont go wrong. You can see in the pic below how clearly the bags are marked, just open the one you need.
Tip: The SX series of cars do tend to vibrate themselves to pieces, I speak from experience. Make threadlock your friend! Don't use anything too strong, I use a blue one by pacer. Just a drop on any screw going into steel or alloy should do it.
Tip: Make sure you fit the pulley fences the correct way round. They are a very tight fit and you need tough thumbs. I used a stanley blade to put a very small chamfer on the inner edge to help them slip on a little more easily.
The bearings in this kit have a red seal, I am told they are improved quality. This is welcome as the yellow sealed versions in the SX2 weren't particularly blessed with longevity.
Steel layshaft gears are standard and look tough. Although unlike the late version SX2 , which utilised 48dp pinion gears, it is not possible to change the internal ratio. Mine appeared to have a slight tight spot, I dont think this will be a problem and expect them to free up after a pack or two.
Time for a break. A cup of tea and a bar of choc, good stuff!
All the belts in place and ready for the diffs.
Tip: (I didn't use this one myself.) Some people are reporting fraying belts and, in order to avoid this, are applying a thin smear of ca glue to the belt edges.
The diff building instructions are very clear. Follow them carefully and they will end up buttery smooth. The diffs are not the same as the SX2, the two internal bearings are now the same size making maintenance a little easier. The pulley is also slightly different hopefully improving the seal and preventing the ingress of dirt.
Tip: I use a fine grade wet 'n' dry to take the shine off of the diff plates before assembly. This helps prevent slippage. Remember the diff will need running in. This can be done on the bench by holding one wheel and running the car slowly or by gentle running on track. After running in your diffs readjust for maximum life and reliability.
So that's the drivetrain installed and ready to go. Give it a spin and make sure it is free running.
Complete the bulkheads by installing the front and rear shock towers and wing mount.
The wing mount is also different on the SX3. Gone is the flexible oring mounting sytem of the SX2 to be replaced by a rigid mount. I am sure the factory guys will have a good reason for this, maybe just cost, but for me it will probably just mean more broken wings.
Tip: The SX2 flexible wing mount is a direct fit.
So far the build is straightforward and enjoyable.
No dramas and everything is fitting together nicely.
I will be moving on to the suspension next. I will be posting more words and pics in the next few days.
Please go ahead and comment on what you see here or with any tips for the rest of the build.
Come back soon for some more Schumacher luvvin!


No comments:
Post a Comment