Monday, 17 March 2014

Hobao H4e Build . . Part 1

In recent months outdoor racing has been nought but a pipe dream but that shy old sun has been poking his head out just lately so what better time to treat oneself to a nice new kit to build.

OK if you insist!

Rather than opt for one of the more conventional offerings from the traditional manufacturers I dropped my coin on something a little more eclectic.
Hobao, a Taiwanese company well known for their great 1/8 buggies, have put their design guys to work and come up with a 1/10 touring car, the H4e.

Retailing at a smidge under £300 and boasting a number of features not found on other cars, as well as some that are available as expensive options, this kit appears to be decent value. 
I also noticed Atsushi Hara testing one over the winter so it's clearly prompting interest at he highest level.

(Click on any pic for gallery view)

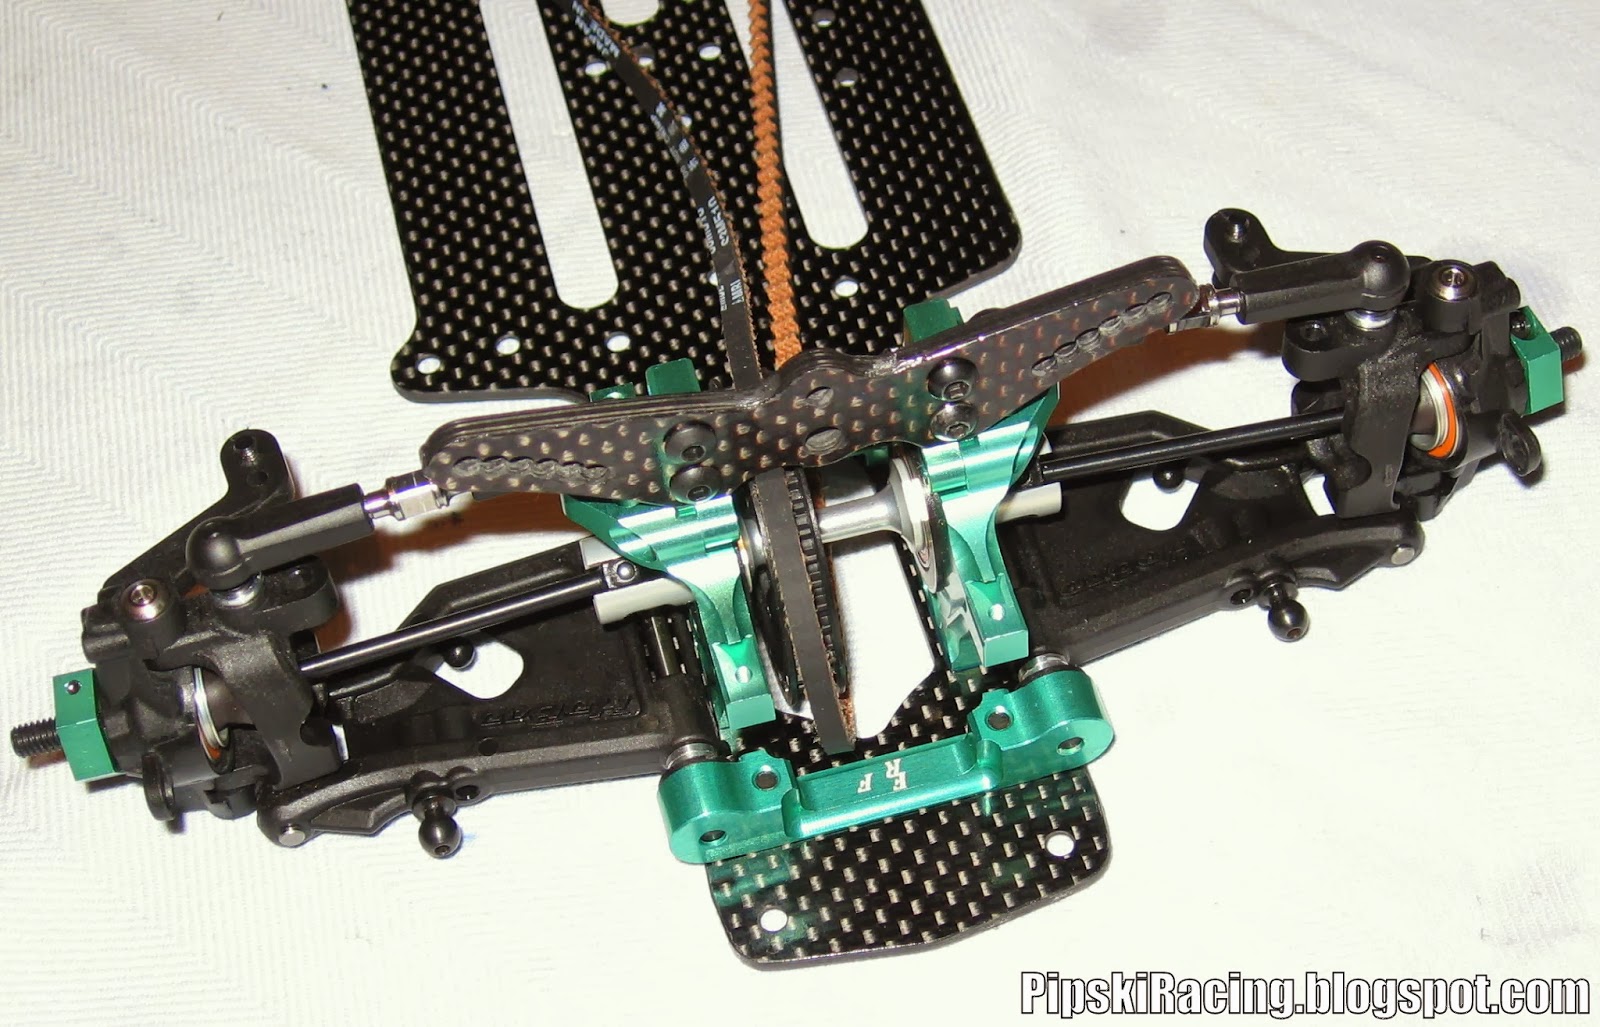
On opening the box one is greeted by the usual assortment of numbered bags full of lots of nice carbon and alloy bling. In their quest to do things differently Hobao have supplied all this nice alloy in green, not to everyone's taste but I like it.


First impressions are that all this alloy and carbon is nicely machined and the plastics look to be well moulded. 


Resisting the temptation to rip some bags open and get this build under way was difficult but as always I took the time to carefully seal and polish the edges of all the carbon parts. 
This is well worthwhile on the chassis plate as it helps prevent delamination, for the rest of the parts its really an exercise in aesthetics, but I'm a tart so I take the time to do it. 

Using a cotton bud I run Cyanoacrylate (super glue) around the edges, cut back with wet n dry (600ish) then repeat and polish with T-cut. The more time and effort you spend on this the better the finish you'll achieve.


Eventually I was able to get the manual out and open a few parts bags.
My manual came with an addendum sheet detailing a few changes, I guess later kits will have these incorporated.
The manual is ok, it doesn't reach the benchmark Xray standard but it does have plenty of clear black and white diagrams that the experienced builder can comfortably follow.


The innovations begin straight away in Bag A.
The alloy bodied shocks are mega big bore short travel items.


Hobao claim that, because of the large bore, these shocks work effectively with a much lighter oil than would normally be used. I fitted them with the 3 hole pistons (2 hole are also supplied) and filled them with AE20w oil.


The supplied springs are rated as 'medium' I invested in the the Hobao optional 'soft' and 'hard' springs as I know of no others that will fit.


With the shocks built and put to one side I moved on to the diffs.
Almost all touring cars currently available come with a front spool and rear gear diff, the green machine is no exception.


The spool bolts together nicely.
The kit outdrives are alloy, steel parts are available from the options list.


When building the rear gear diff there are a couple of areas that warrant extra care. Firstly pay attention to the shimming, mine was quite tight with the kit shims so I ended up re-shimming to loosen it up a little.
Second, when joining the case halves ensure the large sealing o-ring is properly seated to guarantee a smooth leak free unit.


Fill to the cross shafts with 1000wt oil.


No leaks .. Yay!


Given Hobaos background it's no surprise to find that the c-hub arrangement owes more to 1/8 buggy design than current touring car thinking, we'll see how it works on track soon enough.


A couple of points of note in these bags are the alloy hexes and double cardan joint (DCJ) driveshafts both big buck options on other well known brands.
DCJ driveshafts provide more and smoother steering lock


The DCJs come pre-built but it's worth giving them a once over. I applied a little black grease and then used a little heat shrink around the assembly.

The arms look like sturdy fellas. 


Time to start bolting some of this green goodness to the chassis.
I use a blue thread lock on all steel into alloy screws, this prevents screws loosening in use whilst at the same time preventing corrosion and allowing easy removal when necessary. 


A nice feature here is that the upper half of the bulkhead is hinged to the bottom half, thus ensuring diff  maintenance is a doddle.


Decent heavy duty belts come as standard.


The hinge pins run in nylon inserts, kick up is adjustable using the supplied shims under the pivot blocks. 


Another handy little feature is the holes in the ball cups allowing access to the pivot ball without popping the cup, causing unnecessary wear and tear. 


Coming together nicely.


With the shocks mounted to the front end I'm starting to get a feel for what the finished car is going to look like, pretty good methinks.


So far I am enjoying this car, it's nice to build something that seems to pull together some of the best features of its competitors whilst at the same time managing to be a little different. 

That's it for now, time for a cold one, I'll be back in the man cave soon to find out what else Hobao has in store for me.

Check back in a couple of days for Part 2.

Tuesday, 26 November 2013

Schumacher Cougar KF - Electrics Install & Paint

 So time to get some electrics in the KF.
I splashed out on a new motor for this one, a Speed Passion V3 6.5t.
The plug in connectors of these motors lead one to believe they will be an easy install but this is not really the case. Due to the way the wires enter the back of the can it's actually fairly tricky to keep the motor wires as neat as one would like.
The upside is that once installed they can be easily changed out for another SP motor, handy if conditions change or you run at tracks where a different wind would be a better choice.

(Click on pic for gallery)

Wednesday, 20 November 2013

What the 'F'? Schumacher Cougar KF build (Part 2)

I'm back in the shed.
I'm enjoying this build so much I couldn't stay away for very long.


Starting at the rear end the time has come to start making this thing look like a car.
Having assembled the shock tower and wing mounts bolt them to the transmission housings.
These housings are the same as the K1 and although the kit items are plastic some tasty alloy option parts can be had, maybe Santa will bring me some? 


Monday, 18 November 2013

What the 'F'? Schumacher Cougar KF build (Part 1)

It's been an exciting week in the Pipski man cave.
I have got my grubby mitts on the latest release from the lads in Northants, the forward motor Cougar KF.
The rise of the forward motor car is not without controversy but that's a debate for another day, its a phenomenon that looks like it's here to stay so, I'm in!  

(click on any pic for gallery)

To anyone who has built a Schumacher before, that's probably most of you, the box contents will be a familiar sight.


Tuesday, 5 November 2013

CE1 ... The XB2 that the XB4 could have been!

Now that Xray are about to release their 2wd drive version of the XB4 I thought I would show you a project that a friend of mine, Chris Ellis, has been working on.

After having a successful season campaigning his XB4 as a 2wd he has utilised this experience to make some alterations to the car that he feels will improve it's performance even further.

 After a few long evenings beavering away in the workshop he has produced a car that many people think the the Xray XB4-2 should be.

It is certainly interesting and worth a closer look.

As can be seen from the picture the changes are quite substantial.
The saddle cells are gone and the motor mount is rotated 180 degrees thus enabling the motor to be relocated at the rear of the chassis together with the esc and a shorty battery .
To contribute further towards the perfect weight distribution the servo has been centred under the front top deck.

What you see here is a prototype. Chris tells me the car drives as he hoped it would and initial tests have been impressive.
  Some top drivers have been enlisted to help him develop this car in to a winner, they are currently testing it in varying conditions to ensure it works well whatever the surface/conditions come race day. 


It seems to be a well executed conversion.
I don't know if Chris plans to bring this to market at some point but if he does I'm certain there will be no shortage of potential buyers.
Good luck with it bud.

The layout seems to make a lot of sense and is a good way to utilise the shorty pack that is becoming ever more popular. 
Team C clearly feel the concept has a future as can be seen below with the TM2.


It is quite exciting times for 2wd drive buggies with the bigger manufacturers picking up on the design solutions that talented home designers have come up with.

Watch out for new releases soon from Schumacher and, for the well heeled, Team Xtreme and the RudeBits DB2. 
Indeed is Dave DB1 Burton the man responsible for the rise of the forward/mid motor 2wd?

A note of caution however.
The rise in popularity of 2wd off road in recent times has been, in some part, due to the increased costs involved in running touring cars.
These new 2wd cars are flippin', and in my opinion unjustifiably, expensive and rip through tyres at an alarming rate, it's not unusual to see racers using a fresh set for every round at bigger race meetings.
I'm not sure this is the way forward.

What do you think?

Friday, 20 September 2013

When is a 4wd not a 4wd? . . . When it's a 2wd!

The hot topic trackside and the subject of much controversy just now is the conversion of 4wd drive cars into 2wd.
Indeed just such a car won the mid-south regional series in the very capable hands of Glen Westwood. Further examples could be found in at least one National 'A' final.

This is being done in several different ways depending on the car and/or driver.
Some are removing all front wheel drive parts including diff and forward drive shaft, others are merely removing the front drive shafts and leaving the front diff, and all drive thereto, in place.

Opinions vary as to whether there is an advantage to be had one way or the other and if so on what types of track.

The big question is however how would this work in the hands of the average racer.

(Click any image for gallery view)

Tuesday, 17 September 2013

Xray XB808 to 808E brushless conversion.

Over the last couple of seasons it has slowly dawned on me that I am not likely to become a 1/10 off road world champion any time soon.
Whilst I fully intend to pursue this thus far unattainable ambition I have decided to see if my talents might be suited to another class.

Regular readers will know that I am the proud owner of an immaculate Xray 808 nitro buggy which has been gathering dust in the man cave. 
I love this car but the need for a pit man means any form of gas racing really is a two man class. Being a bit of a grumpy old bugger I don't really like to trawl around the pits begging favours from fellow racers so the only solution if I want to go 1/8 racing is electric power.
Turn it on, put it down and race!

So dear readers I am off 1/8 electric buggy racing.

First job, strip down the old girl and decide on the way forward.
Out with the (just run in) motor, fuel tank, electrics and throttle/brake assembly.
I will wrap these up and store them carefully, I refuse to butcher any of them as I may well convert back at some point.

(Click on any image for gallery)

Tuesday, 10 September 2013

EOS Finals F2/Vets/Juniors at TORCH

I travelled the well worn path to TORCH again at the weekend, but this time for one of the more important meetings of the year, the BRCA End Of Season Finals for F2s Juniors and the old boys, the Vets, amongst whom I reluctantly count myself.

This was an important meeting for the TORCH boys as it was a chance to prove they are capable of hosting a National level meeting, with all that this entails.

(Click on any pic for photo gallery.)

Despite the online whinging from some of the more northern drivers the turnout was excellent with what appeared to be a full entry, so full that I didn't make it in to the 2wd race on the Saturday and had to settle for a place in one of the ten 4wd heats on Sunday.  
It makes a nice change for one of these big events to be held 'darn sarf'.

I arrived early Sunday morning to a campsite full of bleary eyed Saturday racers emerging from their tents recovering from the previous evenings shenanigans, looks like I missed out on a goodun!